Here in the midwest we have been enjoying an Indian Summer. Literally have not had socks nor a jacket on since late spring! Well - autumn kissed us last night - the air is crisp and bright.
Perfect time to whip out this all seasonal card featuring Totally Trees by Stampin' Up!
With the images included you will be able to use this set year round. Several pieces will work as background and what's always a plus - it works for guy cards!
This video is under 2 minutes. Switch out the colors and you can do the same quick card EVERY season!
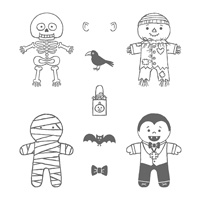
Here is literally a 2 minute video on how to make this super easy, but such fun card featuring the Cookie Cutters - Halloween stamp set from the current Holiday Mini.
A couple of hints - the folder is 3D - super thick. I ran it thru my Big Shot with the new platform LESS the thin die adaptor and used only ONE cutting plate on the top. You can have a deeper indentation if you want, but for this card it was plenty as is!
The frame is made with the new Square thinlets. Nestle one RIGHT INSIDE the other and it cuts a perfect little scallop frame. There are so many die sizes - you can frame anything, lol.
The orange glitter paper is super sparkly and a nice addition to the colors already available.
If you watch carefully, you can see my little tip on how to adhere something so thin. Simply lay it on a piece of backing from dimensionals. When you roll the fuse over the frame, it won't stick to the backing and all clings back onto itself and whatever you are sticking down! Fave tip of the day for you!
Order this set and punch via my webstore - see link on the sidebar - and I will send you all of the card pieces by mail so you can stamp whichever card is your favorite! Offer expires Oct 10, 2016.
One day the stars might align....My space will be clean. I will have some spare time. All of my 'stuff' is put in its proper place. Today it is one out of three! I still have all my camp buckets out, hoping to video the projects soon - and I need to run some errands.
But the space is clean. And oh, so, inviting. If only I could just spend some time working on some scrapbooks - that is what I want to do.
For now - just take a peek into my Stampin Up creating space!
I used several new items on these cards! They can be used for October birthdays - or include them with a treat to send to the little ones you might not have the chance to see in person for fall festivities!
One fun new thing is the first ever 3D embossing folder - this thing is so.....hefty, lol. When I first took it out of the packaging I thought it must have had cardboard in it - but nope! It is just really sturdy.
It’s easy to make a great impression! Just place flat cardstock in this embossing folder, run it through the Big Shot, and out comes cardstock with a bold textured design.
Dynamic Textured Impressions Embossing Folders take embossing to the next level, with deeper, more detailed impressions than standard embossing folders—great for card fronts and accents.
* 1 folder
* 6" x 6" (15.2 x 15.2 cm)
* Use with Big Shot
New to the Holiday Mini are the stamps - Cookie Cutter Halloween and the ORANGE glimmer paper. I love the glitter papers, so having another color is always fun!
Cookie Cutter Halloween Wood-Mount Stamp Set
142252
Price: $23.00
This is your official warning: Just a few stamps in and you may find yourself liking these gingerbread-shaped Halloween characters better than your real-life friends. We're only a little sorry about that.
Our classic wood-mount rubber stamps * Have deeply etched images so you get a superior stamped impression each time. * Are precut so you don't have to trim. * Come with farmed-maple wood blocks—you don't need to buy blocks separately. * Permanently mount on the blocks so they're ready to go when you are. * Come packaged in cases with images on the spine for easy storage and quick reference.
Quantity: 10 rubber stamps
The Labeler stamps are new this year and are in the regular catalog. Watch soon for the How To Video!
Purchase this set by Sept 30 - and I will send you the ready cut pieces of cardstock and frames so you can make your own!
Love this bundle! I was pleased the top panel was so pretty, because the bottom card front is so stinkin cute it was hard to cover it up!!
This is one of my September camp projects - although camp is full this time. We will use the set again in October :) It reminds me of my wardrobe in the 70s!
Another video to inspire you!! This one features a BEAUTIFUL die cut for the Big Shot called Flourishes......
The background paper is lightly colored with a sponge roller. The fun thing about this set of paper - it will match WHATEVER ink you are using - since you color it yourself!
I use small labels to mark which color the sponge daubers with. Because we made this card at camp, you can see I used a dimensional to stick them to their ink pad, making sure that colors don't get smushed onto the wrong pad.
Adhere everything lightly first with an outline of SNAIL or FUSE, then once it is all placed where you want add a bit of the tiny glue to hold it. One of the pretty things about this card is the dimension. So you don't want to glue it all down, just enough to hold it in place.
Here is another how to video! It features the stamp set from Stampin' Up! Cottage Greetings and the embossing folder, washi tape and Designer Series paper from the Affectionately Yours suite.
I embossed with the folder onto watercolor cardstock, so there is lots of impression. Watercolor was done with the Wink of Stella pens. So pretty in person!
This is a fun summer birthday card from those of us that live in the midwest! Nothing says warm wishes like the thoughts of warm summer nights with lightening bugs aglow all around.
Here is a short 'How To" video on making the card.
Some helpful hints:
When stamping the jar - you have the option for the lid on or off! For example - if you are adding flowers to use the jar as the vase - lid off. But so our fireflies don't escape, we need the lid on. Simply stamp the jar and then the lid directly on top - exactly where a mason jar lid would go!
Then - so your flies are not on top of your vase - cut the spaces for them with the big shot die - then once you have cut the flies out themselves, simply pop them back in - just like a puzzle.
If you have been in my kitchen, you know my love of old green glass, thus my choice of pool party for my jar. The only added 'color' is the gold Wink of Stella pen to the bodies of the flies. Glowing wings and light in the jar are added with clear Stella.
You can see in the video when I run the words thru after the first initial 2 rolls, I flip it upside down and roll it again. Especially when using the thicker glitter paper, this helps gets a nice perfect cut all the way through.
Stampin Up! items used
Jar of Love bundle
A Little Foxy designer series paper
Last spring we renovated my office - it is 'this close' to being done. But, summer came - and there is nothing I love more than summer evenings by the pool, weekend getaways and vacations.... so my office is still not quite complete. A few more things to put away, a few more things to hang. Which all means it is not ready just yet for it's big photographic reveal. Til it is (soon!) here are some sneak peek pics at my new storage unit. One word describes it:
Here is a quick little video to show you how easy it is to make this cute little baby deer card.
Materials Needed:
Stamp sets - Foxy Friends, Celebrate Today, B.Y.O.P
Inks - Soft Sky, Creamy Caramel and Memory Black
Papers - Soft Sky, Whisper White, Irresistibly Floral designer series paper
Misc - Foxy Friends Punch, Celebrate Today framelits, Sponges, adhesive
Just a couple of tips - when using the foxy friends punch, I always flip the punch over and slide my paper in BEFORE I stamp - then you can make sure you stamp the direction that will punch. For some reason stampers remind me of kids learning to put on their shoes. More than half the time the stamp is the wrong direction to fit into the punch :) You can see how I do it in the video.
Secondly - if you find that your framelits don't fit the stamp and you are using photopolymer, you are probably 'bending' the stamp a bit as you adhere it to your block. Instead - try this - lie you die down and the stamp just under it so it is nestled inside. Lift it up and lay it on your block, press - and it will fit perfectly!
Be careful when stamping on resist paper - it will take a second longer to dry.
And when stamping onto foam pads, all that is needed is a SUPER LIGHT press - otherwise you will find that you have ink on your block. You can see in the video, I stamp in the 'corners' of my pads so as little as possible of the block is over the pad.
Enjoy! If you would like to order any of the materials shown - I will be happy to help you! If you order the Foxy Friends bundle by Sept 30, 2016 from me - I will send you the paper materials you need to make this card at your home!
I have a 24 hour sale on starting NOW on orders from the hot off the press Holiday Mini!
If you would like details on how to save 20% on your order - contact me!
This September Stampin Up is offering weekly special offers - the first is shown above!